Getting Started with Your DIY Weather Station: Essential Tools and Materials
Building a weather station might seem daunting, but it's a rewarding project! This article outlines the fundamental tools and materials needed to get started, from basic hand tools to essential sensors like a thermometer, hygrometer, and rain gauge. We'll guide you through budget-friendly options and explain the purpose of each component, making your first weather station build accessible to everyone. Learn how to choose the right tools for accurate weather monitoring and understand the basic principles behind weather data collection. Safety tips included!
Why Build a Weather Station?
Beyond the simple joy of creating something with your own hands, a DIY weather station allows you to observe and understand the weather patterns in your local area. You can track temperature changes, humidity levels, rainfall, and even wind speed (with more advanced setups). The data you collect can be fascinating, allowing you to analyze trends and gain a deeper appreciation for meteorology. Imagine understanding the microclimates in your backyard or being able to predict a sudden shower based on your own measurements - that's the power of a DIY weather station!
Essential Tools: Your Weather Station Workshop
You don’t need a fully equipped workshop to build your weather station, but having the right tools will make the process much easier and safer. Here's a breakdown of essentials:
- Screwdrivers (Phillips and Flathead): For assembling components and mounting sensors. A basic set is usually sufficient.
- Pliers: Useful for gripping, bending, and cutting wires.
- Wire Strippers/Cutters: Crucial for working with electrical connections.
- Drill: For creating mounting holes in your weather station housing and mounting platform.
- Measuring Tape/Ruler: Accuracy is important for proper sensor placement. Precise measurements are vital for reliable data, especially when considering factors like solar radiation exposure for temperature sensors.
- Saw (Hand or Power): Depending on your housing material, you may need to cut wood or plastic. The type of saw you'll need will depend heavily on the material you choose for your enclosure; a simple hand saw might be sufficient for softwood, while a power saw will make quick work of hardwoods or plastics.
- Safety Glasses: ALWAYS wear safety glasses when cutting or drilling! Protect your eyes—they've only got one set.
- Gloves: To protect your hands from sharp edges and splinters.
Essential Materials: Gathering Your Components
The heart of your weather station lies in its sensors. Here’s a look at the key components you’ll need:
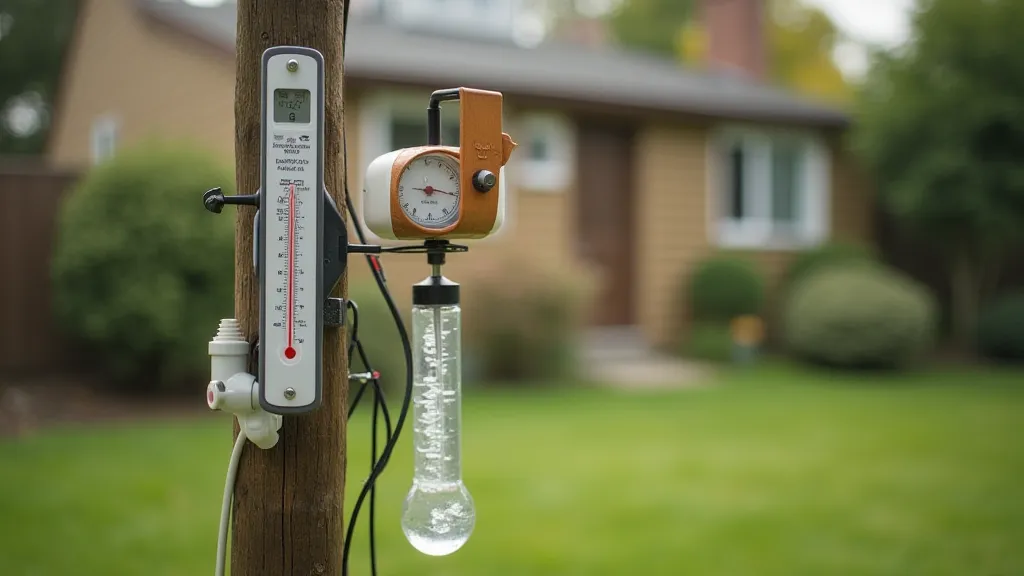
- Thermometer: Measures air temperature. Digital thermometers are readily available and offer good accuracy. Consider a shielded thermometer to minimize direct sunlight influence.
- Hygrometer: Measures humidity. Similar to thermometers, digital hygrometers are convenient and precise. Proper placement is important – avoid direct sunlight and heat sources that could skew humidity readings.
- Rain Gauge: Collects and measures rainfall. You can purchase a manufactured rain gauge or create a simple tipping bucket design. Building a simple rain gauge can be a great introductory project. If you're interested in a detailed walkthrough, check out building a simple rain gauge for step-by-step instructions.
- Anemometer (Optional): Measures wind speed. More advanced and can be pricier, but adds valuable data.
- Weatherproof Enclosure: A container to house the sensors and electronics, protecting them from the elements. A plastic storage box or a custom-built wooden box will work. Ventilation is key to preventing condensation buildup.
- Mounting Platform: A sturdy surface for placing the enclosure and sensors. This could be a pole, a wooden post, or a section of your house. Consider the height needed to avoid obstructions and ensure accurate readings.
- Wiring and Connectors: For connecting the sensors to a data logger or microcontroller (if you're logging data). Use weatherproof connectors and wiring to prevent corrosion and ensure reliable data transmission.
Building a weather station doesn’t have to break the bank. Here are some ways to save money:
- Repurpose materials: Look for scrap wood, plastic containers, or old electronics to reuse. Old food containers, discarded lumber, even broken electronics can find new life in your weather station project.
- DIY Rain Gauge: Constructing your own rain gauge is considerably cheaper than buying one.
- Start Simple: Begin with just a thermometer and rain gauge, and add more sensors later as your budget allows. It's better to have a few accurate sensors than a lot of inaccurate ones.
- Consider Open-Source Options: There's a thriving community of DIY weather enthusiasts. Look for open-source hardware and software solutions to reduce costs and share knowledge.
- Careful Placement: Thoughtful placement of your enclosure can significantly impact the accuracy and longevity of your system. Read up on best practices for choosing the right location for your DIY weather station to ensure accurate data.
Safety First!
Working with tools and electronics requires caution. Remember these safety tips:
- Always wear safety glasses when cutting, drilling, or using power tools.
- Disconnect power before working with electrical components.
- Work in a well-ventilated area.
- If you're unsure about any step, consult a knowledgeable friend or online resources. The DIY weather community is vast and supportive; don't hesitate to ask for help.
- Protect from the Elements: Your weather station will be exposed to the elements. Remember that appropriate protection and shielding is crucial for long-term operation. Consider methods for protecting your weather station from the elements to extend its lifespan.
Once you're equipped with the right tools and materials, you're ready to start building your weather station! The next phase involves constructing the housing, mounting the sensors, and, if you're logging data, setting up your data logger or microcontroller. Good luck, and happy weather watching! Think about factors like solar gain on your thermometer, the impact of wind on your rain gauge readings, and the general impact of environmental factors on the integrity of your readings.